![[USER'S GUIDE] Mambobaby Self-inflating Baby float](http://mambobabyshop.com/cdn/shop/articles/1234566543.png?v=1688699761&width=1)
Thank you for choosing the Mambobaby Self-inflating Baby float. This guide is here to help you understand how to use your new float safely and effectively. The float is designed with your baby's safety and comfort in mind, and with proper usage, it will provide a fun and enjoyable swimming experience for your little one. In the following sections, we'll provide you with detailed instructions and tips for using your Mambobaby Self-inflating Baby float.
SELF-INFLATING CHEST FLOAT
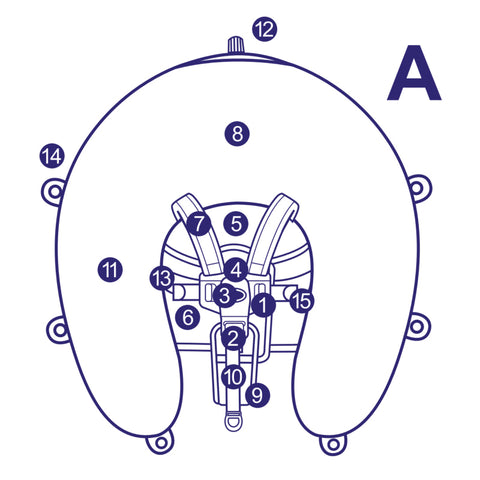
| 1. Chest strap adjustable buckle 2. Crotch rest 3. Crotch belt adjustable buckle 4. Crotch rest adjustable strap 5. Five-way buckle 6. Main part 7. Five-way buckle protective cover 8. Nozzle |
9. Chest / back rest 10. Fixing chest strap 11. Back wings 12. Canopy mounting hole 13. Shoulder strap 14. Chest adjustable strap 15. Headrest |
PREPARATION BEFORE PUTTING ON SELF-INFLATABLE CHEST FLOAT
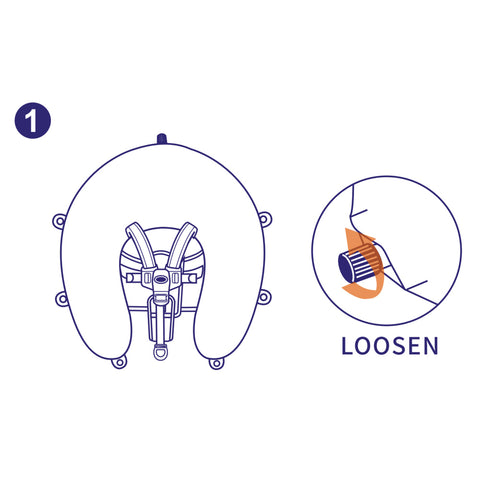
Tile the product,loosen the cap of the nozzle (A-12) andexpand the float for 1 minute.
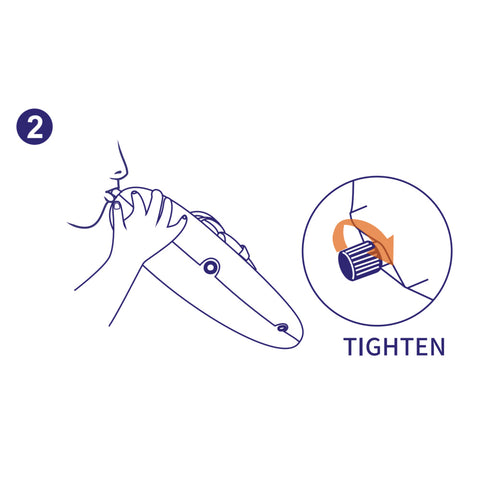
lf necessary, blow with your mouth to replenish air.Please tighten the lid after self-inflating is completed.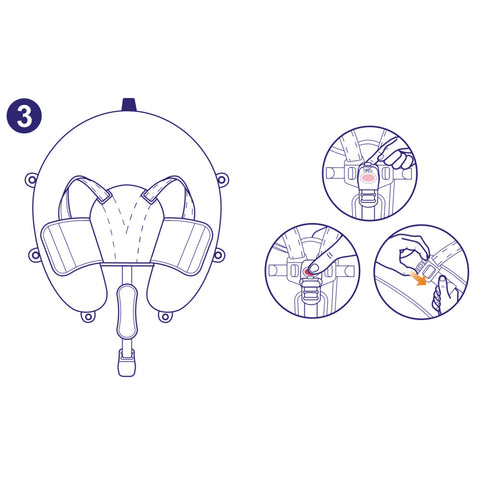
- Open the protective cover of the five-way buckle (A-3),and press the red button to release the buckle.
- Press and hold the buttons on the left and right chestadjustable buckles (A-1) to lengthen the chest adjustablestraps (A-15),so that your baby's hands can pass through the shoulder straps (A-7 ) more easily.
- Undo the hook and loop fastener of the back wings (A-6)to spread it to prepare the float for wearing.
SELF-INFLATING FLOATING BED
| 1. Chest strap adjustable buckle 2. Crotch rest adjustable strap 3. Crotch belt adjustable buckle 4. Main part 5. Five-way buckle 6. Nozzle 7. Five-way buckle protective cover 8. Fixing chest strap 9. Floating bed netting |
10. Canopy mounting hole 11. Back wings 12. Tail 13. Shoulder strap 14. Mounting snaps 15. Headrest 16. Leather snaps. 17. Crotch rest 18. Zipper |
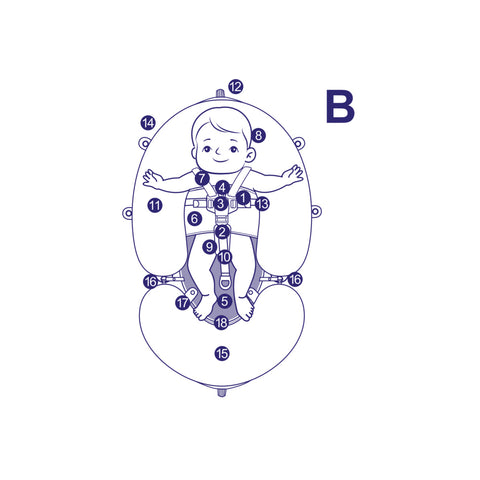
HOW THE FLOATING BED TRANSFORMS INTO A CHESTFLOAT
Undo the four mountingsnaps (B-16) and twoleather snaps (B-17).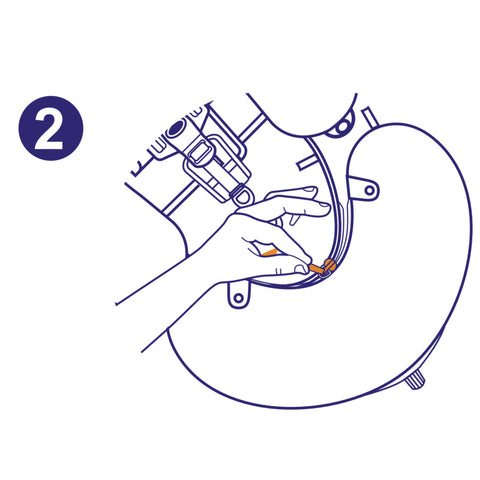
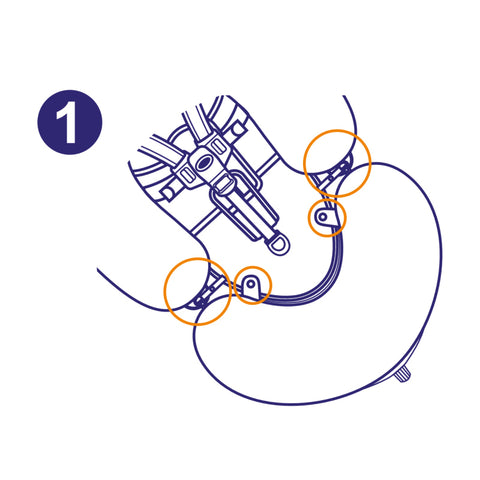
Unzip the zipper (B-18)to separate the tail fromthe main float.
Flip the main part (B-11) to thebottom of side. Fold the floating bednetting (B-5) in the direction of thebottom of the headrest (B-8) andfasten its three mounting straps withthe three mounting holes on theinside of the bottom of the float.
The next step is tofollow the "PUTTINGTHE CHEST FLOATON BABIES".
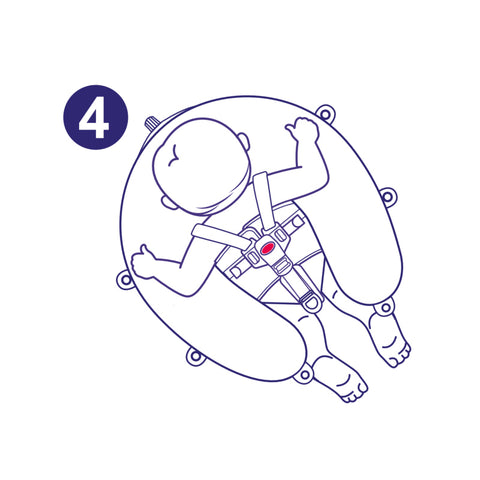
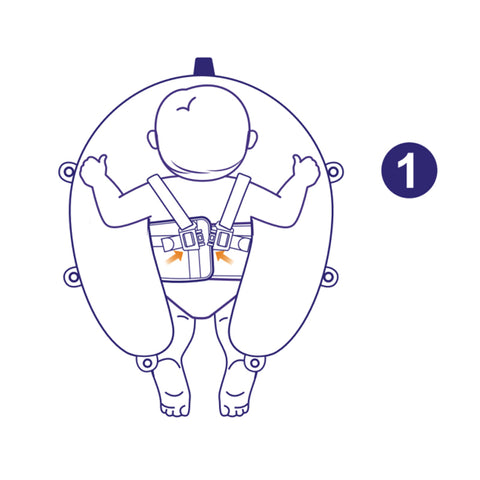
PUTTING THE CHEST FLOAT ON BABIES
PUTTING THE CHEST FLOAT ON BABIES
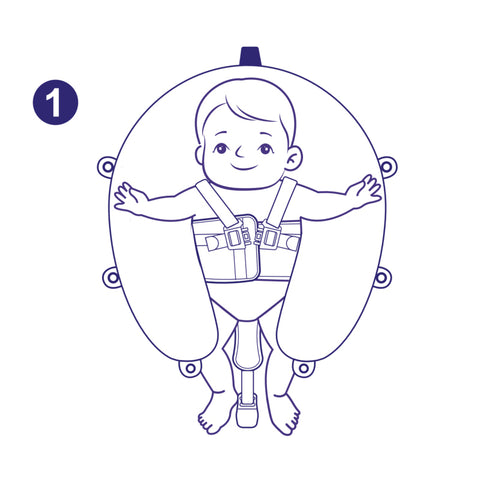
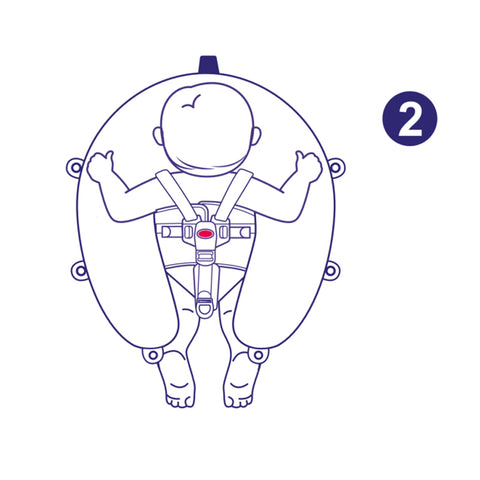
- Place your baby on its back on the chest/back rest(A-5) in the middle of the float and place the back ofthe baby's head in the nest of the headrest (A-8).
- Put your baby's arms through the shoulder straps(A-7).
- Close the two back wings (A-6) and attach the hookand loop fastener to fit your baby's chest.
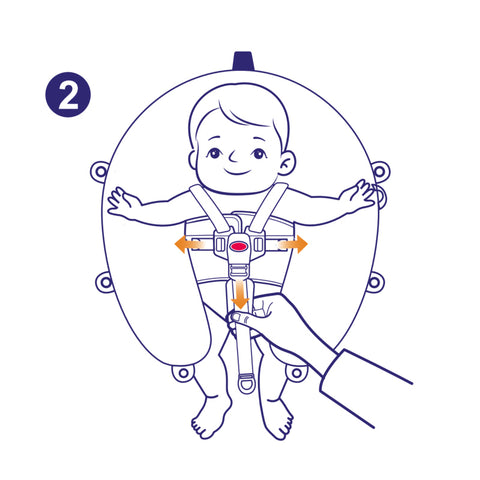
- Fasten the five-way buckle (A-3) until you hear thesound of a click.
- Press and hold the buttons on the chest adjustablebuckles (A-1) to adjust the length of the chestadjustable straps (A-15).
- The length of the shoulder straps (A-7) can beadjusted by pulling the crotch strap (A-10).
Float on the baby's stomach (3-24 months old)
- Place your baby on its stomach on the chest/back rest (A-5) in the middle of the float andplace its chin within the headrest area.
- Put your baby's arms through the shoulder straps(A-7).
- Close the back wings (A-6) and attach the hook and loop fastener to fit your baby's chest.
- Fasten the five-way buckle (A-3) until you hear the sound of a click.
- Press and hold the buttons on the chest adjustable buckles (A-1) to adjust the length of the chestadjustable straps(A-15).
- The length of the shoulder straps (A-7) can be adjusted by pulling the crotch strap(A-10).
ASSEMBLY AND STORAGE OF CANOPY*
*The canopy is optional
PARTS OF FLAT CANOPY
| 1. Mounting strap | 2. Snap button | 3. Arrow |
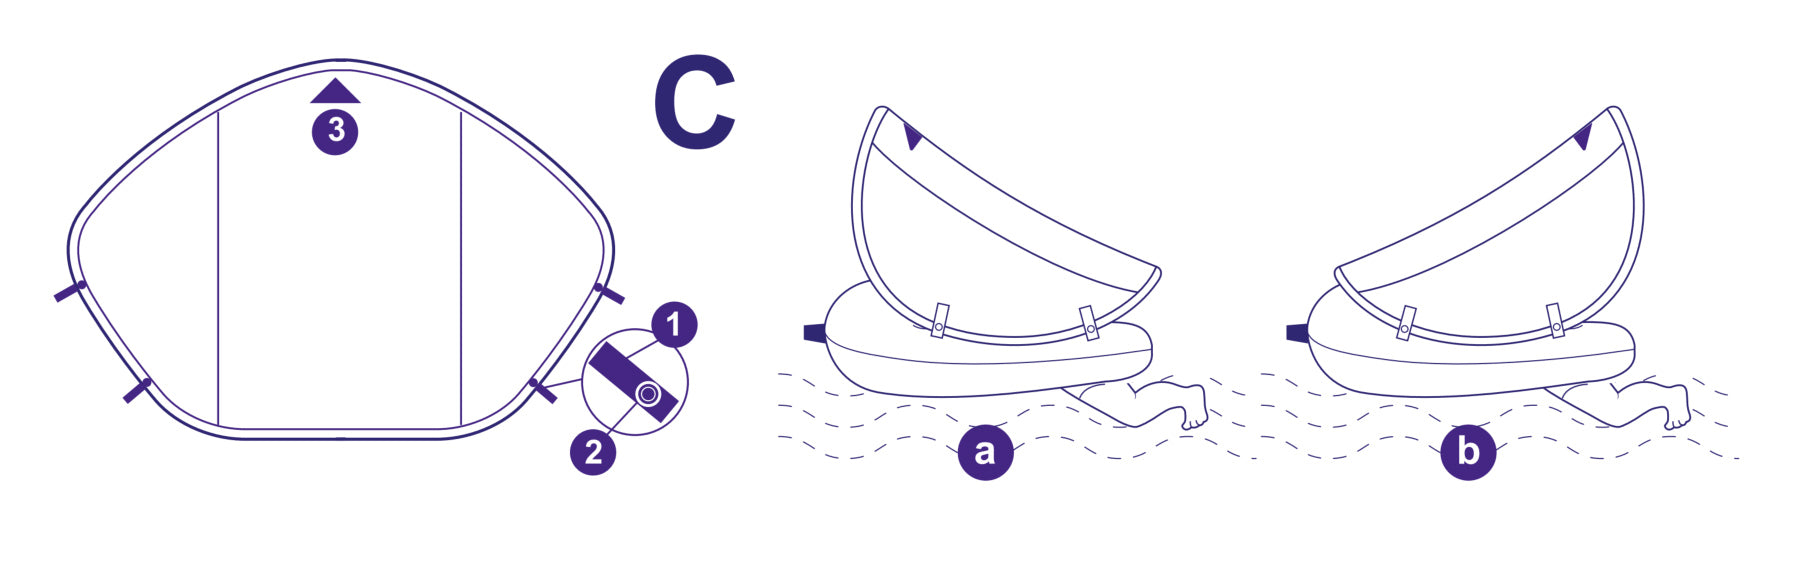
Unfold the sun canopy with the silver side facing downward.
- When floating on its stomach, the arrow (C-3) on the canopy points towards to the head of the float.
- When floating on its back, the arrow(C-3) on the canopy points towards to the end of the float.
The flat canopy should be avoided bouncing into the baby when the four snap buttons of the canopy are carefully unbutoned.
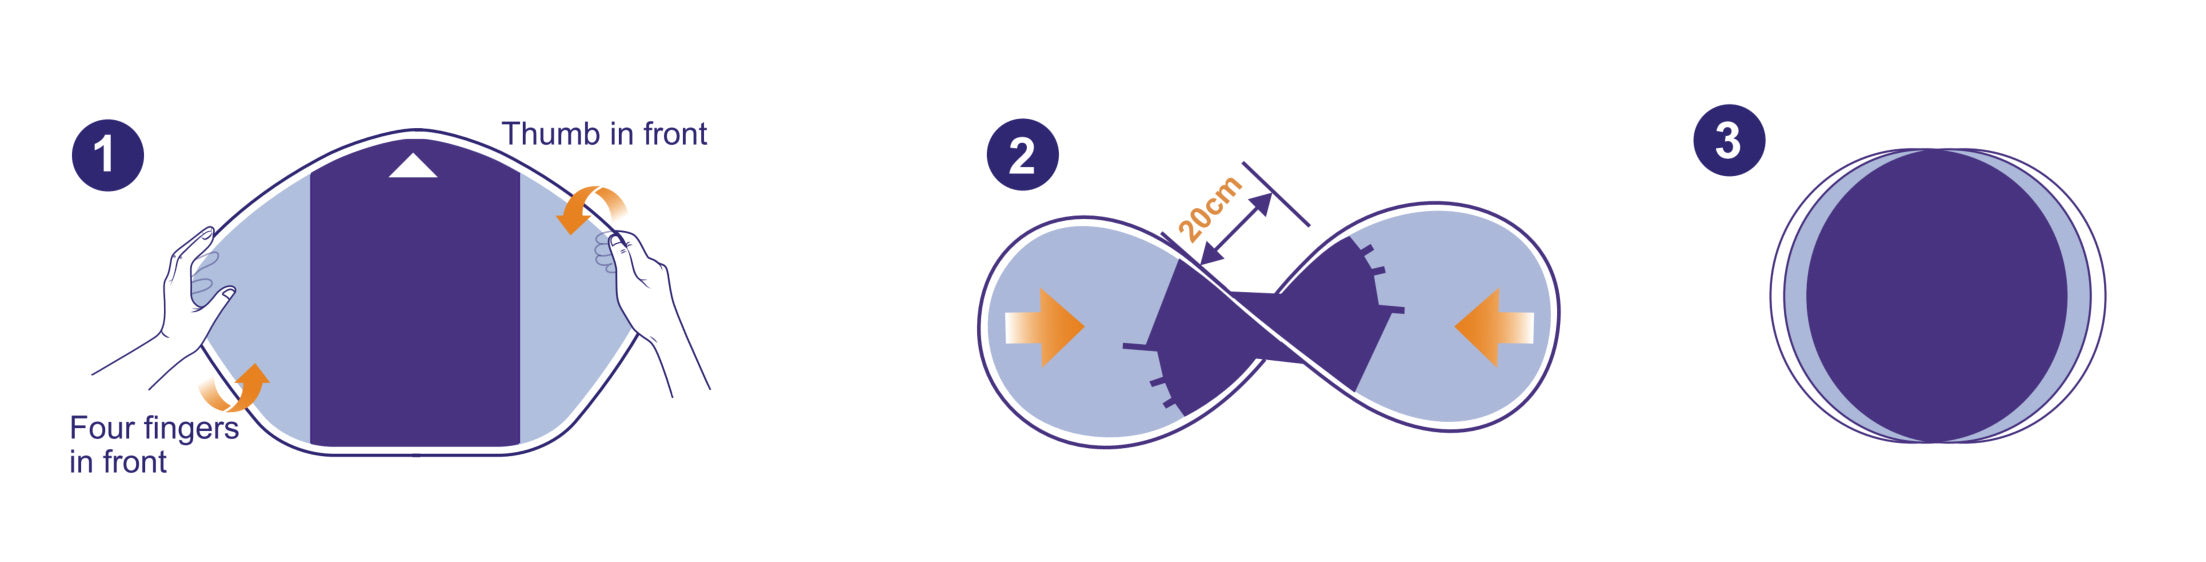
| 1. lt is important to grip the edges of thecanopy with your fingers in the positionshown and twist it in the direction of the redarrow. | 2. Do not snuggle after twisting it into afigure-8 shape.The distance betweenthe front and the back is around 20cm.Push your hands towards the middle. | 3. Finally,pack the folded canopyinto a bag to prevent it frompopping open. |
STORACE STEPS

| 1. Please loosen the air nozzlecap. Fold the float in half. Rollit from the back side to theside of the nozzle slowly andsqueeze the gas out. | 2. Fold the float in half. Roll itfrom the back side to the sideof the nozzle slowly andsqueeze the gas out. | 3. Tighten the nozzle to prevent the gas fromentering.Keep the float in bags. |


